|
Create Pivot Folders |

  
|
|
|
Create Pivot Folders |
|
|
|
Skip this section if... you are NOT making Private-to-Private relationships. |
Private-to-Private relationships require a public Folder as a "pivot point" to facilitate moving messages from one mailbox to another. Pivot Folders should be considered special folders used for this purpose and none other. This means you will need to create new Pivot Folders which are not visible to users.
Determine which kind of items you will be synchronizing (calendars, contacts or tasks) and create a Pivot folder for each. Each type only needs one Pivot Folder. The same folder may be used as a pivot for all relationships of that type.
To create Pivot Folder with Outlook, continue to the next section. Otherwise go to the section Creating Pivot Folders with OWA.
Creating Pivot Folders with Outlook
| 1. | Log into a workstation with Outlook and open Outlook. |
Creating a Pivot Folder in "All Public Folders" with Outlook

| 2. | Select Folder List and expand Public Folders. Right-click on All Public Folders and select New Folder. |
Creating the Pivot Folder
|
|
| 3. | Give the new folder a descriptive name such as "Pivot Calendar" (contacts, etc.) and select the appropriate content type. Select the folder under which to create the new folder, in this case All Public Folders. |
| 4. | Click OK and close Outlook. |
Continue to the section Assigning Folder Ownership.
Creating Pivot Folders with OWA
| 1. | Open Internet Explorer while logged in as the Service Account on the Synchronization Server and go to http://localhost/exchange. |
Outlook Web Access
|
| 2. | Click on Public Folders. Log in again if required. |
Creating a Pivot Folder in "Public Folders" with OWA
|
| 3. | Right-click Public Folders and select New Folder. |
Creating the Pivot Folder
|
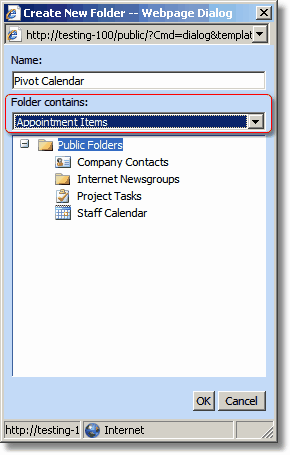
| 4. | Give the new folder a descriptive name such as "Pivot Calendar" (contacts, etc.) and select the appropriate content type. Place it under the appropriate folder group by highlighting that group, in this case All Public Folders. The folders will not be visible to users, so the choice of folder location is mostly a matter of administrative convenience. |
| 5. | Click OK and close Internet Explorer. |
| 1. | On the Synchronization Server, login as the Service Account and open Exchange System Manager. |
Selecting Pivot Folder Properties in Exchange System Manager
|
| 2. | Open the Public Folders subtree and right-click the new Pivot Folder. Select Properties. |
Per-user Information (General Tab)

| 3. | Uncheck Maintain per-user read and unread information for this folder. This will enhance the performance of Exchange since it will not have to track unnecessary information for multiple users. |
Selecting Client Permissions of the Pivot Folder
|
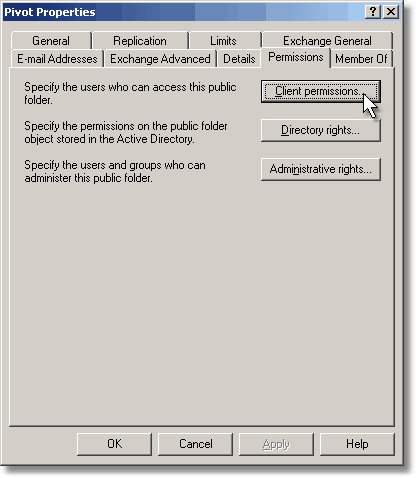
| 4. | Select the Permissions tab and click Client permissions. |
Service Account Permissions
|
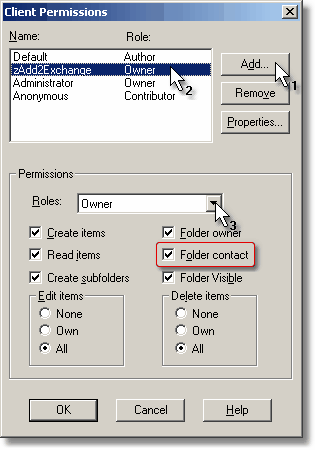
| 5. | Select the Service Account under Names. Make sure the Owner role is selected and all checkboxes are checked (including Folder Contact). If you created the folder from an account or profile that was not the Service Account, you will need to select these values. |
| 6. | Remove any names other than the Service Account, Default and Anonymous. |
Default Permissions
|
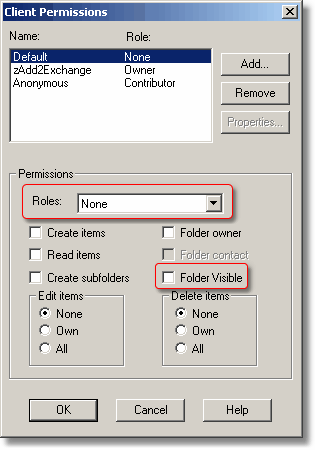
| 7. | Select Default under Names. In the Roles dropdown, select None. This will remove all permissions except Folder Visible. Uncheck Folder Visible. |
| 8. | Click OK and close Exchange System Manager. |
Repeat as necessary for each Pivot Folder.
blog comments powered by Disqus
Page url: http://guides.diditbetter.com/a2e-guide/create_pivot_folders.htm