|
Attaching a Template to a Distribution List in RGM |

  
|
|
|
Attaching a Template to a Distribution List in RGM |
|
|
Relationship Group Management Dialog
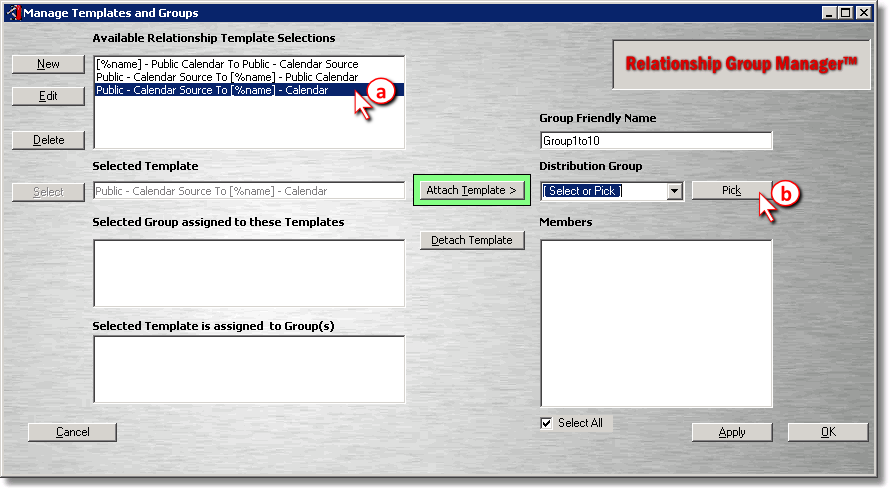
| 1) | Follow these steps: |
| a) | Select the Relationship Template which you created in the last section. |
| b) | In the Distribution Group drop-down, either select an existing group or click the Pick button to pick the distribution group from the address book. In this example, we will pick the group from the address book, so we will click Pick. The distribution list must already exist in the Global Address List. |
|
Tip It may be best to set up a distribution list specifically for synchronization, with a name such as zContactsSync, for example. The "z" makes sure it gets sorted to the end of the address book in order to keep it inconspicuous to your users. The use of a specific list prevents unintended synchronization to the users who get indiscriminately included in general distribution lists such as Staff. |
Address Book Dialog

| 2) | Continue with these steps: |
| a) | Find the Distribution List which you would like to assign to the template. Select it in the list on the left-hand side. |
| b) | Click Pick 1 - >. The distribution list will appear in the right-hand side. |
| c) | Click OK. |
|
Important It is advised to not pick email-enabled security groups, as they cannot be synchronized. |
Relationship Group Manager

| 3) | Continue with these steps: |
| a) | Enter a "friendly" name for the group if you wish. |
| b) | If you would like the membership for this relationship to include only a subset of the users in the distribution list, unselect the users you do not want in the Members list. These are exclusions from the group relationship. |
| c) | Click Apply. |
Group Relationship Confirmation Dialog

| 4) | Click Yes. |
Congratulations, you've created a group relationship!
blog comments powered by Disqus
Page url: http://guides.diditbetter.com/a2e-guide/attaching_a_template_to_a_dist.htm

